How to Pressure Wash a Driveway: A Step-by-Step Guide
A grey, stained driveway drags down the whole front of a house. Tyre marks, oil drips, moss in the shaded corners and a winter’s worth of grime can make solid concrete look tired years before its time. Most of it comes off with water, pressure and a bit of method — no harsh chemicals and no tradie required. This guide explains how to pressure wash a driveway from start to finish: the gear to gather, the pressure and nozzle to use, the order to work in, and the mistakes that etch concrete or strip pavers.
Set aside a morning: a standard single driveway usually takes one to two hours of washing once the prep is done, and the surface needs a day or two to dry. Work on a mild, still day — wind blows spray back at you, and hot sun dries detergent onto the concrete before it has worked.
Before you start: read the surface first
Not every driveway is the same, and the surface decides how hard you can push. Plain poured concrete is the most forgiving. Exposed aggregate is tougher than it looks, but the stones can loosen if you hold the jet too close. Pavers need care around the joints, because the jet can blast out the sand that holds them together. Painted or sealed concrete is the most delicate of all — too much pressure lifts the coating in sheets.
Walk the whole driveway before you touch the machine. Note the oil stains, the mossy patches and any cracked or loose sections, and where the water will run once you start. Fill or flag cracks first: a jet forced into a crack can widen it. Sweep the surface, move cars, bins and pot plants off the driveway, and close the windows facing the work area. Check your local water and council rules first — Victoria, for example, restricts mains-water use on hard surfaces, and some councils require wash water to be kept out of stormwater drains.
How to Pressure Wash a Driveway: What You Need Before You Start
You do not need a trailer full of gear. For a standard residential driveway you need: a pressure washer in the 2,000–3,000 PSI range with a flow rate of around 8–12 litres per minute; a 25° green nozzle for the main clean and a 40° white nozzle for pavers and delicate spots; a stiff outdoor broom and a garden hose; a degreaser for oil stains; a surface-cleaner attachment if the driveway is large and flat; and a bucket, scrubbing brush and old towels for edges and corners.
Safety gear is not optional. A pressure washer jet can cut skin, and the spray throws grit and small stones back at your face. Wear safety glasses the whole time, gloves, and enclosed rubber-soled shoes — the surface gets slippery fast. Add ear protection with a petrol machine. Never point the spray at people or pets, and never point it at yourself to test it. Keep children and pets inside while you work.
Picking the right pressure and nozzle
For a standard residential driveway, 2,000–3,000 PSI is the sweet spot, with a flow rate of about 8–12 litres per minute. Pressure does the cutting; flow does the rinsing and carries the dirt away. A machine with plenty of pressure but a low flow rate cleans slowly, because the dirt has nowhere to go. Our guide to what PSI means for a driveway explains the difference in full, including why the maximum PSI on the box is not the pressure that reaches the concrete.
Nozzles are colour-coded, and the colour is the spray angle. The wider the angle, the gentler the spray over a larger area:
| Nozzle | Spray angle | Use on a driveway |
|---|---|---|
| Red | 0° pencil jet | Never use on a driveway — it cuts lines into concrete |
| Yellow | 15° | Stubborn spots only, held well back, with care |
| Green | 25° | General driveway cleaning — your main nozzle |
| White | 40° | Pavers, painted or sealed surfaces, rinsing |
| Black | 65° / soap | Applying detergent at low pressure |
The 0° red pencil jet concentrates the full pressure into a needle of water, and on concrete it leaves permanent stripes and can chip the surface. It has no place in driveway cleaning. If a stain will not shift with the green nozzle, the answer is a degreaser and dwell time, not a narrower jet.
Hold the lance at about 45° to the surface, with the nozzle 20–30 cm away from the concrete — never closer than 15 cm on concrete, and further back on pavers or sealed surfaces. The 45° angle pushes dirt ahead of the spray instead of driving it deeper. Test on a small, out-of-sight patch first and check the result before committing to the whole driveway.
What a suitable machine costs
You do not need the most powerful machine on the shelf. Any of the electric models below sits in or near the right range for a residential driveway. Prices are from Bunnings listings, checked 18 November 2026 — re-check before you buy, as prices move with sales and stock.
| Model | Pressure | Flow rate | Price |
|---|---|---|---|
| Ryobi 2030 PSI High Pressure Washer | 2,030 PSI | 7 L/min | $269 |
| Ryobi 2465 PSI RACPWS7 | 2,465 PSI | 7.5 L/min | $379 |
| Ryobi 2750 PSI RACPWS4 | 2,750 PSI | Not stated in listing | $499 |
| Gerni 5400 | 2,147 PSI | 8.3 L/min | $439 |
| Karcher K4 Premium Power Control | 2,100 PSI | 7.0 L/min | $599 |
| Karcher K5 Premium Smart Control | — | — | $1,149.90 |
The Ryobi 2030 PSI at $269 is the cheapest way into the right pressure range. The Gerni 5400 at $439 pairs similar pressure with a higher flow rate, so it rinses faster. The Karcher K5 at $1,149.90 is more machine than most driveways need. For a fuller comparison, see our pressure washer buying guide.
How to Pressure Wash a Driveway, Step by Step
Step 1 — Clear and sweep
Move everything off the driveway and sweep it clean, paying attention to the edges where dirt collects against the kerb and the garage door. A clean surface lets the jet work on stains instead of pushing loose grit around.
Step 2 — Pre-treat oil and stubborn stains
Oil stains need a degreaser, not more pressure. Apply a driveway degreaser to the stained areas, work it in lightly with a stiff brush, and let it dwell for 10–15 minutes. Do not let it dry on the surface — if the day is warm, mist it lightly to keep it damp.
Step 3 — Test a small patch
Fit the green 25° nozzle, hold the lance at 45° and about 25 cm from the surface, and clean a small patch in an inconspicuous spot. The concrete should look cleaner without any lines, pitting or loose aggregate. If the patch looks etched, step further back or switch to the white 40° nozzle. If nothing shifts, move a little closer — but never inside 15 cm on concrete.
Step 4 — Apply detergent if needed
For a heavily soiled driveway, apply detergent with the black soap nozzle at low pressure, working from the bottom up so it does not streak down over dry concrete. Let it dwell for 5–10 minutes, keeping the surface damp. Skip this step on a lightly soiled driveway — plain water and the green nozzle are enough.
Step 5 — Wash in long, overlapping strokes
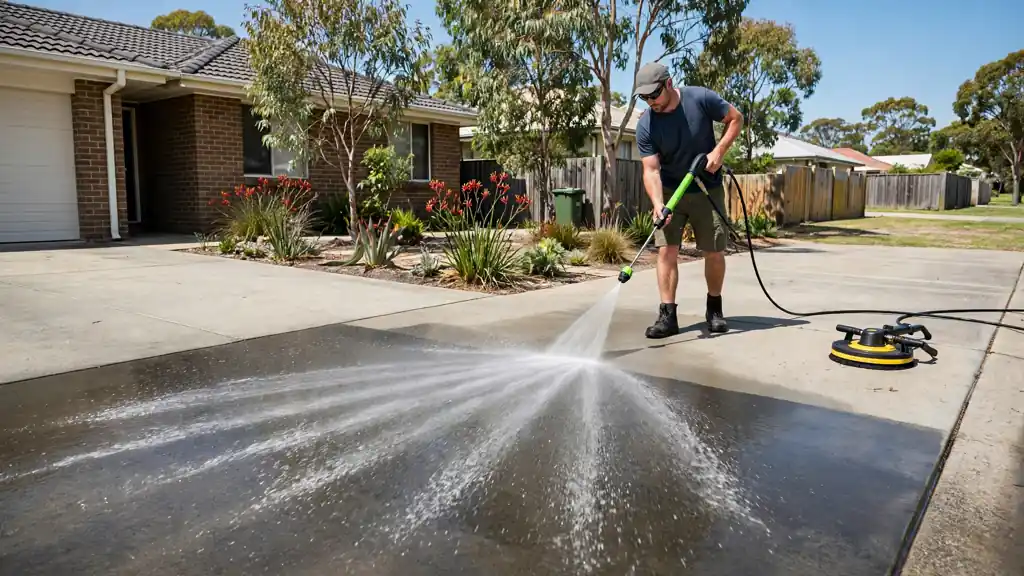
Start at the highest point of the driveway — usually the garage end — and work down towards the street, so dirty water runs away from the clean area. Hold the lance at 45°, keep the nozzle 20–30 cm from the surface, and move in long, steady, overlapping strokes, like mowing a lawn. Overlap each pass by about a third so you do not leave stripes between passes. Keep the lance moving at a constant speed: lingering in one spot etches a mark, and rushing leaves patches behind.
Work in sections of about two metres wide, finishing each section before moving on. On a large, flat driveway, a surface-cleaner attachment covers a wide path evenly and cuts the job time sharply.
Step 6 — Edges, corners and joints
Edges and corners need a slower pass. Run the green nozzle along the kerb edge, the garage door threshold and any steps, then switch to the white nozzle for paver joints so you do not blast the jointing sand out. Top the joints up with fine paving sand after the driveway dries. A scrubbing brush handles the tight corners the lance cannot reach.
Step 7 — Rinse thoroughly
Rinse the whole driveway with plain water, still working from high to low. The rinse water should run clear before you stop. Push pooled water towards the street or the lawn with the spray.
Step 8 — Let it dry, then decide on sealing
Let the surface dry for 24–48 hours before sealing, and longer in cool or damp weather. Sealing a damp driveway traps moisture under the sealer, which leads to clouding and peeling. Check the dry surface for missed patches before sealing.
Wash water, drains and your local rules
Stormwater drains carry rainwater straight to creeks and rivers, with no treatment along the way. Wash water from a driveway can carry oil, detergent, moss treatment and grit, so where your council requires it, keep it out of the stormwater system. Whitsunday Regional Council warns that wastewater from high-pressure cleaning can pollute waterways and advises keeping detergents out of drains — the same principle applies around the country. For a home job, sweep up loose dirt first, use detergent only where it is needed, and keep the wash water on the lawn or garden where it can soak in where that is allowed.
How to Pressure Wash a Driveway: FAQs
How much PSI do I need to pressure wash a driveway?
For a standard residential driveway, 2,000–3,000 PSI is the sweet spot, with a flow rate of about 8–12 litres per minute. Below 2,000 PSI the job is slow and stubborn stains may not lift; above 3,000 PSI you risk etching concrete and stripping paver joints.
Can I pressure wash a driveway with a 2,000 PSI machine?
Yes. A 2,000 PSI electric machine with the green 25° nozzle handles a standard concrete driveway well, especially if you pre-treat oil stains with a degreaser and let it dwell for 10–15 minutes.
What nozzle should I use on a concrete driveway?
Use the green 25° nozzle for general cleaning, held at about 45° and 20–30 cm from the surface. Switch to the white 40° nozzle for pavers, painted or sealed concrete, and for rinsing. Never use the red 0° pencil jet on a driveway — it cuts permanent lines into the surface.
How long does it take to pressure wash a driveway?
A standard single driveway usually takes one to two hours of washing once the prep is done. A double driveway or a heavily stained one can take half a day. A surface-cleaner attachment cuts the washing time sharply on large, flat areas.
Should I seal my driveway after pressure washing?
Sealing is optional but worthwhile on concrete that stains easily — it makes the next clean much easier. Let the surface dry for 24–48 hours first, and longer in cool or damp weather. Sealing a damp driveway traps moisture under the sealer and leads to clouding and peeling.
Can I pressure wash my driveway during water restrictions?
It depends on your area. In Victoria, permanent water saving rules allow mains water on hard surfaces only for hazards, staining or construction work. Check your water authority’s current rules before you start, and never wash during a total hose ban.
Done properly, pressure washing is one of the cheapest ways to lift the look of a home’s frontage — and that is how to pressure wash a driveway properly: the right pressure, the right nozzle, a steady distance and overlapping strokes, working high to low.